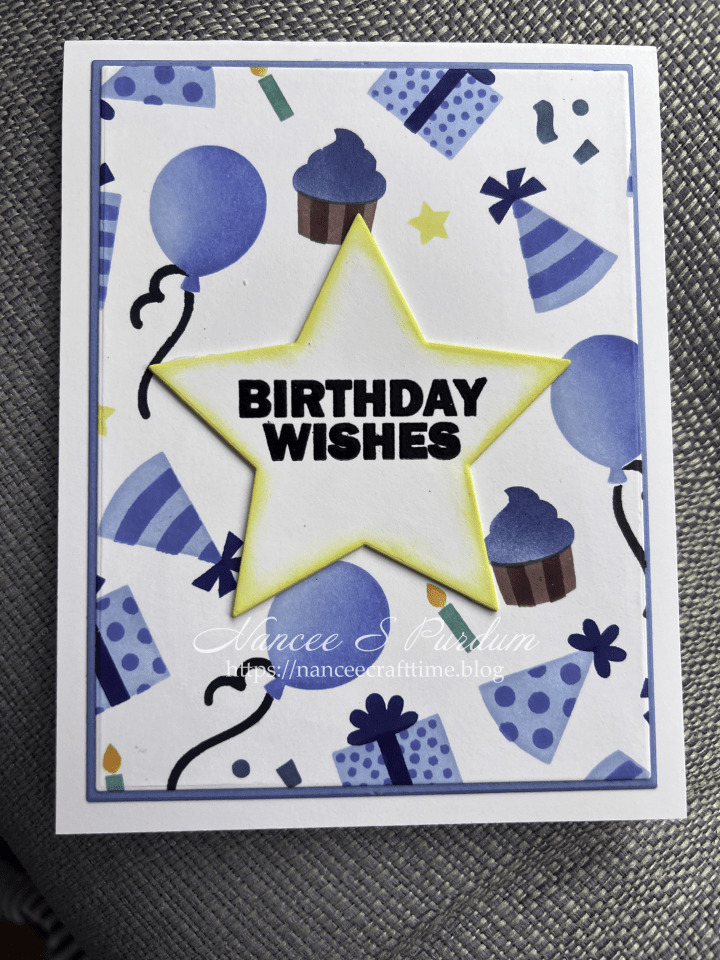
My card today features stenciling. My card features a layering stencil from Pretty Pink Posh. This stencil set has three stencils which allows for you to use different colors. You can always use different colors on each stencil by masking off the areas you don’t want to color.

- I cut down a piece of white card stock using Master Layouts #1 from Gina K.
- I placed my card stock on my Sticky Mat from Altenew.
- For the areas that I wanted a different color, I used some stencil material to mask off those areas so I wouldn’t get color in those areas. When I changed colors, I simply removed the masks from the uncolored areas and added my second color.
- I repeated this process for each of the remaining two stencils.
- Once I had all three stencils colored, I placed the first stencil back on my cardstock and added some shading to the balloons and cupcake icing using a slightly darker color.
- I repeated this process with the candle flames which were on a different layer.
It sometimes is hard to line up the different stencils. There are grid marks on the Sticky Mat, however, I still sometimes have trouble lining up the stencils. I have the Stampwheel Center Alignment Guides and thought that they might help me line up the stencils. I first centered my stencil over my cardstock and then added the largest alignment guide up against the stencil. This worked great. I was easily able to line up each layer of the stencil set.
- The stencil set does leave an area in the middle where you can place a sentiment.
- I have an older die set of stars that I thought would be perfect for my sentiment.
- I selected a size that would accommodate my sentiment but not cover too much of the background.
- I stamped my sentiment and then heat embossed it with clear embossing powder. This gave my sentiment some shine and dimension.
- Once I had my sentiment complete, I added some Squeezed Lemonade Distress Oxide ink to the edges. This helps my sentiment to stand out on the card and became the focal point.
- I added my sentiment to the center of the stenciled panel.
- I added my stenciled panel to a Powder Blue mat and adhered the panel to my card base.

I was happy with how the stenciling lined up. If you have trouble lining up the layering stencils give this method a try. If you don’t have the alignment guides, placing a piece of card stock along two sides might work just as well.
Thanks for stopping by and Happy Crafting!

Supplies used:
Pretty Pink Posh: Layered Birthday Wreath
Altenew: 9 X 12 Ultra Sticky Mat, Stampwheel Center Alignment Guides
Gina K: Master Layouts #1, Birthday Cheer
Sizzix: Stars Framelits (I have an older set which has 5 different sizes)
Cardstock:
Gina K: Powder Blue
Inks:
Altenew: Caribbean Sky Fresh Dye Ink, Toasted Mauve Fresh Dye Ink, Sunray Fresh Dye Ink, Redwood Fresh Dye Ink, Sapphire Fresh Dye Ink, Snapdragon Fresh Dye Ink, Jet Black Fresh Dye Ink, Persian Blue Fresh Dye Ink, Mystic Lake Fresh Dye Ink, Starlight Fresh Dye Ink, Teal Tempest Fresh Dye Ink
Gina K: Powder Blue
Distress Oxide: Squeezed Lemonade


cute card Nancee! I’m not familiar with the stamp wheel or the master layouts so fun to see them in action!
LikeLiked by 1 person
Thanks Pam! The Master Layouts are coordinating dies that cut panels that perfectly layer together. I love them for making my panels to fit my cards. The stamp wheel is similar to the Misty except the top is not connected. You can turn the top to stamp in other areas of your card without moving your paper. The alignment guides are sold separately so you don’t have to have the stamp wheel to use them.
LikeLike