As another year of birthdays begins, my plan this year is to post my birthday cards shortly after the recipient receives them. I will also be posting (at least this is my plan LOL!) other cards using different techniques that I want to try. In between posts of my cards I will also create some posts on some other crafts that I make or try. At least, this is my plan.
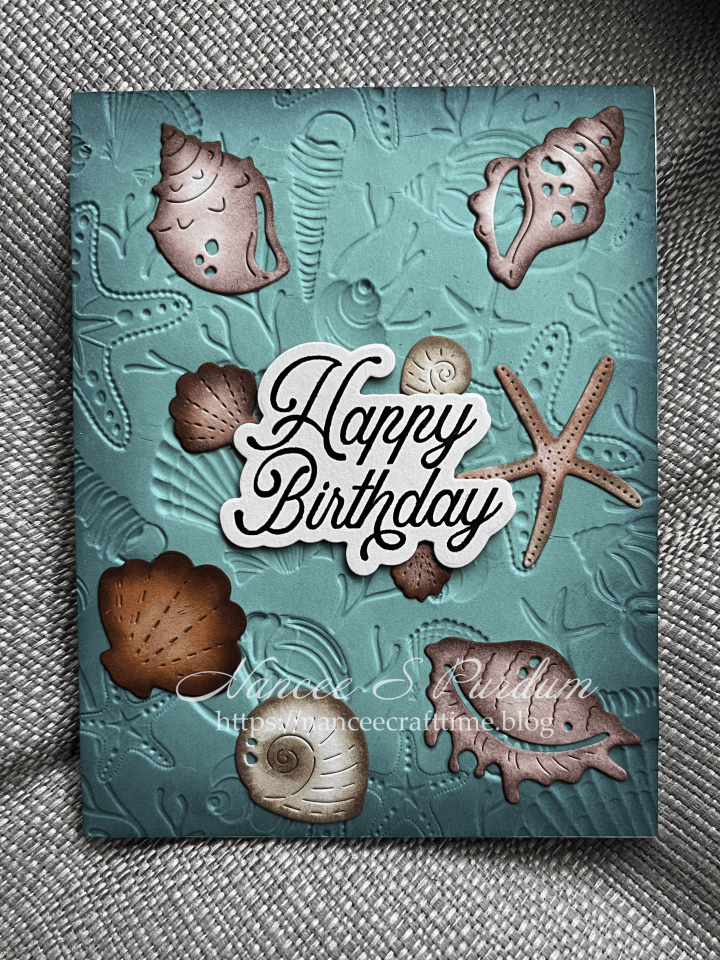
My first birthday card of the year is a pretty easy card to make. It involves dry embossing, heat embossing, die cutting, and inking.

- I first cut down a piece of Tranquil Teal card stock to fit the front of my card base.
- I used Scattered Shells embossing folder from Spellbinders.
- I had intended to use the raised side as the background but then changed my mind when I was trying to figure out what I was going to do as my focal point.
- Using a blending brush, I added some Mystic Lake ink around the edges of the panel making sure I left the middle of the panel without any ink.
- Using Teal Tempest and my blending brush, I added ink around the edges making sure I left enough of the Mystic Lake ink showing.
- I then adhered the panel to my card base.
By adding the ink around my panel, it helped to emphasize the embossed images.

- To keep with my ocean theme, I die cut some shells from some white cardstock with the intension of adding some ink to the outer edges of each shell.
- I began adding some Cappuccino ink to the outer edges of the starfish and one of the shells.
- Once I had completed adding the ink, I changed my mind and decided to add more color to the shells, so I added Pucker, Blush, Redwood and Toasted Mauve to the shells to add more color to the shells.
- Before I added my shells to the card, I inked and embossed my greeting.
- With the matching die for the sentiment, I cut it out and one additional die cut to add behind the sentiment for some dimension.
- I centered my sentiment on my card front but did not adhere it yet.
- I then placed the shell die cuts around the front of the card and when I was happy with it, I took a photo with my phone so I could remember the placement.
- Once I was satisfied, I first adhered the shells and then my sentiment.

This was a pretty easy card to put together.
Thanks for stopping by and Happy Crafting!

Supplies used:
Spellbinders: Scattered Shells
Waffle Flower: Seashells Die, Best Wishes stamp and die
Gina K: Master Layouts #1
Cardstock:
Gina K: Tranquil Teal
Inks:
Altenew: Mystic Lake, Teal Tempest, Redwood, Toasted Mauve
Simon Says Stamp: Cappuccino, Pucker, Blush
Versa Clair: Nocturne


OOOOHHHHH this is so pretty Nancee! I love these colors together!
LikeLiked by 2 people
Thank you Pam!
LikeLiked by 1 person