
For my card today, I used an older rubber stamp from Whimsy Stamps. I also used a new technique to me that I recently saw in a Gina K YouTube video. I combined some inking, die cutting, an embossing folder and some Copic coloring. I also made this as an A6 card instead of my normal A2 card.
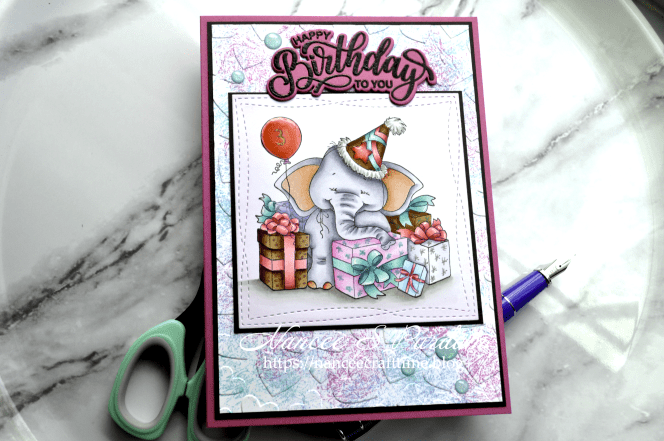
I first created my background.
- I tore off a small piece of saran wrap and wadded it into a small ball.
- I tapped the saran wrap on my ink pad and then tapped my paper. This left a small area of “ink” where the saran wrap had picked up ink. I did this several times and then repeated the process with a second and then third color.
- Once I was satisfied with the amount of ink on my paper, I added a small mist of water to back of my paper and then added it to my embossing folder.
- I ran my paper through my Intri-Cut a couple of times to make sure I had a good impression.
- I then added a mat to my background.
By adding a small mist of water to my paper before running it though my Intri-Cut, there is less cracking of the paper.

My next step was to stamp and color my focal image.
- I stamped the image using Memento Tuxedo Black ink as it is Copic friendly.
- I colored the image using my Copic markers. I have listed the colors I used at the end of this post.
- I added some details to the packages using atYouSpica glitter pens.
- Once I had the image colored, I used Wonky Stitcked Squares to cut the image out.
- I cut a mat slightly larger than my image from some brown card stock.
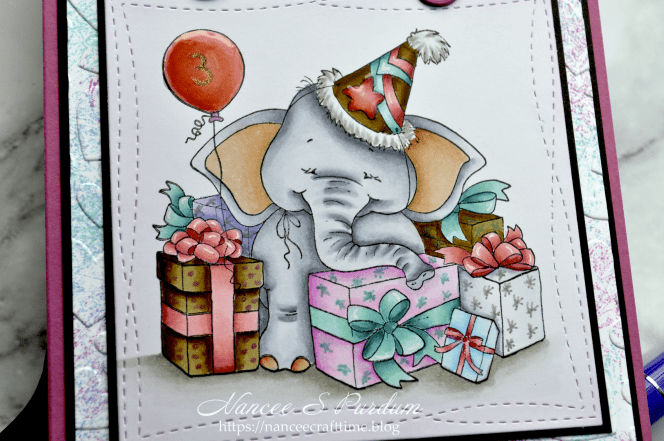
- I used a gold glitter pen to add the number “3” to the balloon and then added some glossy accents over the top of the balloon.
- I stamped my sentiment in some brown ink and then some VersaMark ink and added some clear embossing powder. After heat setting the embossing powder, I cut the sentiment out using the matching die. I cut a couple of additional die cuts to add to the back of the sentiment so I could pop it up.
Finally, I added my matted image onto my background and then added everything to a pink card base. I added a few glitter dots and my card was complete.

Thanks for stopping by and Happy Crafting!

Supplies used:
Gina K: Happy Hearts embossing folder, Birthday Sparkle stamp & die, Passionate Pink cardstock, Chocolate Truffle cardstock, Detail clear embossing powder
My Favorite Things: Wonky Stitched Squares
Whimsy Stamps: What A Loot
Ink:
Hero Arts: Brown Bark
Other:
atyou Spica Glitter Pens: Pink, Sky Blue, Silver
Ranger: Glossy Accents
White gel pen
Copics: C4, C3, C2, C1, C00, R11, R02, E33, E31, R00, RV29, RV25, RV23, RV21, BG49, BG25, BG23, BG11, E35, E30, RV04, RV02, RV00, BV02, BV01, BV00, BG02, BG01, BG00, W4, W3, W2, W00


Adorable card!!! Love me some Whimsy stamps, especially this adorable guy!!!
I read your msg and you and I could be great friends. We have the exact hobbies, how wonderful!!!
LikeLiked by 1 person
Thanks! Whimsy Stamps have some adorable images! Crafters make the best friends!
LikeLike
What a cute card!
LikeLiked by 1 person
Thank you!
LikeLike