I have a couple of new techniques that I had not used before on this card. I recently watched videos from Gina K and Jennifer McGuire and loved both techniques. I decided to try both techniques on this card. Because of the size of my focal point, this card is an A6 card which is slightly larger than an A2 card.

I tried to remember to take photos of the steps I used to create my card so you could see my process, so this post has more photos than I normally post.
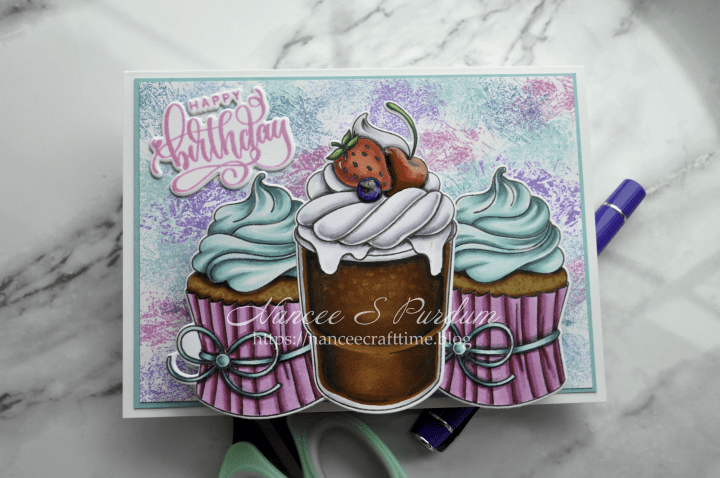
Because I was making a slightly larger card, I had to cut my card base and panels using my paper trimmer. For this card, I needed a top folding card.

I stamped my images using my Stamping Wheel in Gina K Black Onyx ink. This is a Copic friendly ink. When I add my coloring, the black ink will not bleed.


I colored my images using my Copic markers and then added a few fine details using my Prismacolor pencils and white gel pen.


Once I had my images colored, I die cut them using the coordinating dies.

I then started on my background. I added my white panel to my Ultra Sticky Mat so my mat would not move. I took a small piece of Saran Wrap and wadded it up to form a smaller surface. I did not fold it, just wadded it up. I then tapped the Saran Wrap on my ink pad and then tapped it on the paper. This left a really cool pattern. I stamped it several times, each time tapping my ink pad and then the paper. When I changed colors, I tore off a new piece of Saran Wrap and repeated the process. Once I was happy with my coverage, I added the Turquoise Sea mat that I had previously cut. Then I added the panel to my cream-colored card base.

I really like how the panel with the Saran Wrap turned out. I will probably use this technique again as it is a quick and easy background that only requires ink and some Saran Wrap.

After lining up my images, I added some tape to the back to join the images.
- I wanted to make sure I liked the placement before I glued them together to make one continuous image.
- I then created the “pop-up” feature.
- I followed Jennifer McGuire’s pattern of cutting a piece of cardstock 4″ by 1 1/2″, scoring at 1/2″, 1 1/2″, 2 1/2″ and 3 1/2″.
- I folded the cardstock on the fold lines to form a rectangle.
- After applying glue to one of the smaller ends, I attached it to the bottom of my card, centering it where my focal point would be attached.
- I then applied glue to the other short end and lined it up with the end that was already glued to my card.
- This formed a rectangle that I could attach my focal point to. I pushed the rectangle up and applied glue to the top rectangle and lined my focal point up with the bottom of that card.
- Because my image has a rounded bottom, once the glue dried, I rounded the corners of the pop-up feature so that it did not show below my focal image.
When you allow the rectangle to form, the focal point then “pops” out from the card base. The bottom lines up with the bottom of the card and when the card is displayed, the focal point appears to “rest” on a tabletop. The image folds flat against the card to fit in an envelope.


For my sentiment, I first stamped it using Bubblegum Pink. Because I used my Stamping Wheel, I could use my powder tool to remove any oils and then stamp the sentiment again using VersaMark Watermark ink. I then added clear embossing powder and heat set the powder.

I die cut the sentiment using the coordinating die along with two additional in white paper. I glued the white ones together and then glued the stamped sentiment on top. I added the sentiment to my card base.
To finish my card, I added Glossy Accents to the blueberry and cherry to add a little shine. The only thing left was to add my message to the inside panel.

Thanks for stopping by and making it though this long post today!
Happy Crafting!

Supplies used:
Simon Says Stamp: Hey, Sweetie stamp & die
Gina K: Fancy Phrases stamp & die, Detail clear embossing powder, Turquoise Sea card stock
Gina K inks: Black Onyx, Tranquil Teal, Wild Lilac, Powder Blue, Passionate Pink, Sea Glass, Bubblegum Pink
Copics: B39, B69, B66, R39, R37, R35, R32, YR31, RV99, R56, R30, E49, E47, E59, E19, E37, YG67, YG23, YG11, C5, C3, C1, C00, E57, E35, E33, E31, BG18, BG13, BG11, BG10, RV69, RV66, RV63
Prismacolor pencils: PC907, PC942, PC935, PC105, PC938
Tools used:
Altenew: 9′ X 12″ Ultra Sticky Mat, Stamping Wheel
Gina K: Intri-Cut die cutting & embossing machine
We R Memory Keepers: Mini Guillotine Paper Cutter (available at Walmart)
Other: Saran Wrap, Wagner Heat Gun


What a sweet card! That background works really well, simple to do and gives a really nice organic effect.
LikeLiked by 1 person
Thanks! It was a fun card to make!
LikeLiked by 1 person